Most structural frameworks describe the shape of a story from the outside. Seven-point structure does something slightly different: it gives you specific leverage points, moments where the story pivots, and asks you to design each one before you write the scenes between them.
I came to it late, after working with three-act for years. What I found useful wasn’t that it was more detailed, it isn’t, particularly, but that the concept of pinch points, which seven-point introduces explicitly, finally gave me a name for something I’d been getting wrong in every second act I’d ever written.
Where It Comes From
The seven-point story structure is often attributed to author Dan Wells, who popularised it through a series of writing lectures in 2010. It draws on classical narrative theory and is closely related to three-act structure, but with a sharper focus on the moments that maintain tension through the middle of a novel.
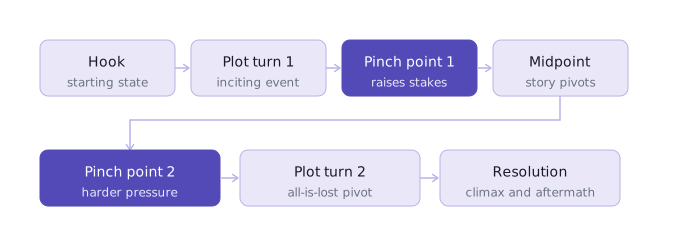
The Seven Points
1. Hook
Where your protagonist starts, their situation, their nature, their world before the story changes it. The hook establishes the contrast with where they’ll end up. It doesn’t have to be explosive; it has to be specific enough that the reader understands what’s at stake in the transformation.
Dan Wells’s advice on this: start with the opposite of your resolution. If your protagonist ends the novel with courage, they begin it afraid. If they end with community, they begin alone. The hook and the resolution should stand in meaningful contrast.
2. Plot Turn 1
The inciting incident, the event that drags your protagonist into the story. Note the language: drags. Your protagonist doesn’t usually choose to enter the conflict. It arrives and they cannot avoid it.
This is your Act One ending. Everything before Plot Turn 1 is setup. Everything after it is story.
3. Pinch Point 1
This is what seven-point structure adds that other frameworks often leave implicit. A pinch point is a moment, usually around the one-third mark, where you remind the reader of the antagonistic force your protagonist is up against.
Not through the protagonist’s perspective. The antagonist, the threat, the darkness, whatever your protagonist is facing, should be shown directly, or nearly so, pressing in on the story. The reader needs to feel the weight of what’s coming. The protagonist may not even be in this scene.
What goes wrong without it: the middle of Act Two loses tension because the reader forgets what’s at stake. The antagonist becomes abstract. The pinch point reanimates the threat.
4. Midpoint
The move from reaction to action. Before the midpoint, your protagonist is responding to events. After it, they’re driving them. This shift is the engine of Act Two’s second half.
The midpoint often comes with new information, a revelation that reframes the conflict, or a commitment from which the protagonist can’t retreat. What it must do is change the story’s direction.
5. Pinch Point 2
The second pinch point, around the two-thirds mark, is harder than the first. The antagonistic force bears down again, this time closer, more personal, more devastating. This is often where an ally is lost, a plan fails, or a truth the protagonist has been avoiding becomes undeniable.
Pinch Point 2 leads directly into the all-is-lost moment. It’s the last darkening before the climax.
6. Plot Turn 2
The all-is-lost moment and the pivot out of it. Your protagonist has hit their lowest point. And then, through a decision, a discovery, or an act of will, they find what they need to move into the climax.
This pivot has to come from within. If the answer arrives from outside, a coincidence, a rescue, information handed to them by another character, the climax it produces won’t feel earned.
7. Resolution
The climax and its aftermath. Your protagonist faces the central conflict directly and resolves it, through action that could only come from who they’ve become over the course of the story.
The resolution is the payoff on everything the hook set up. The contrast between Point 1 and Point 7 is your character arc.
The Pinch Points: Why They Matter
The concept I’ve found most transferable from seven-point structure isn’t the overall shape, it’s the pinch points. They solve a specific problem: the second act losing its sense of threat.
In a lot of novels I’ve read (and a lot I’ve written), the antagonist or the central danger becomes increasingly theoretical in the middle of the book. The protagonist is busy doing things, but the reader loses track of why it matters, what they’re actually up against. The antagonist feels distant.
Pinch points fix this by scheduling two moments, one early in Act Two, one late, where the reader is reminded viscerally of what your protagonist is facing. You don’t have to cut away from the protagonist to do this. But you do have to make sure the weight of the antagonistic force is felt, not just described.
Seven-Point vs Three-Act
The seven points map onto three acts like this:
| Three-act | Seven-point equivalent |
|---|---|
| Inciting incident | Plot Turn 1 |
| Midpoint | Midpoint |
| All-is-lost | Plot Turn 2 |
| Climax | Resolution |
What seven-point adds: the Hook as a distinct starting point (emphasising contrast with the ending), and the two Pinch Points as explicit Act Two maintenance beats.
If you’re already comfortable with three-act structure and your second acts consistently lose tension, try adding pinch points. You don’t need to rebuild your framework, just schedule two moments where the antagonistic force reminds everyone it’s still there.
Planning with Seven-Point
The framework lends itself to planning in reverse, a technique Dan Wells explicitly advocates.
Start with your Resolution: what does your protagonist do at the climax, and who do they have to be to do it? Work backwards from there through Plot Turn 2, the Midpoints, to Plot Turn 1, and then design your Hook as the opposite of your Resolution.
Working backwards forces clarity about what each beat actually needs to accomplish. A lot of structural confusion in planning comes from not knowing the ending, and therefore not knowing what everything before it is building toward. Start with the end.
Writing Desk tip: The Story Plotter includes a dedicated Seven-Point Structure template, with all seven beats placed on the board ready to fill in. Since Dan Wells’ method works backwards from the ending, it’s worth starting at the Resolution card and working right to left, rather than filling the board in the order it’s laid out.
Related reading:

The writing app built for novelists.
Plot, draft, edit, and format your manuscript in one private, local app for Mac. Free to download. Your writing never leaves your machine.
macOS 13 Ventura or later · No account required